


For the past nine years, I suppose I have been lazy about my tree skirt. I always just bunch some fabric under the tree, whatever matches the ornaments I choose that year and cover it up with presents. This year, I have two babies and the presents will not be going under the tree until Christmas morning. I decided this year I needed to make something a bit more attractive than my usual fabric bunch, and boy am I happy I did!
What you'll need:
3 yards of knit fabric
1 yard cotton batting
bias tape
coordinating thread
quilting ruler (I prefer a plexi 6"x24")
quilting needle
sewing machine
closure-velcro, snaps, buttons (optional)
To begin, measure your tree at the base to get it at the widest point then add 4 inches . (I don't have a fairly large tree. Mine measured at 40" so we'll use that for this tutorial)
Open your fabric and measure from the left side over 22". Mark the center and moving your yard stick around, keep the zero line on the center and measure out 22" all the way around. Make your tick marks close enough together that you feel comfortable enough in connecting them to form a circle.
After you have your circle drawn, measure 2" from the center to form an inner circle 4" wide. This circle will be the opening around the tree stand.
Draw one line from the center to the edge of the circle. Cut out your circle, removing the inner circle, and cut along the line for the opening. Repeat this to the batting, and backing material. (You can pin the front and back fabrics together to save time before you begin cutting but I do not recommend layering all three at once)
After you have cut all three-front fabric, batting, and backing, position them to be quilted!
 Carefully pin around the edges of the tree skirt, up the opening, and around the inner edge.
From the inner circle, measure down 3"onto the slit and mark. Draw a line at a 45 degree angle across the tree skirt. Flip your ruler and draw a 45 degree angle in the opposite direction on the same 3" mark. You should now have one big "X" on your skirt. Take your ruler, measure 3" over from the first line you drew. Repeat this process across the entire tree skirt. Do the same to the other diagonal line until you have all of your quilting lines drawn.
 Carefully pin the tree skirt so that all of the layers stay in place as you begin to quilt the tree skirt.
 Starting with one of the middle lines you drew, sew from one end to the other of the tree skirt. Sew the next line over, and repeat moving from the inside to the outside of the tree skirt.
Once half of the lines are dawn, sew the lines that run in the other direction in the same manner-starting in the middle and moving outwards.
Now your tree skirt should be quilted!
To finish the edges, you can either make your own bias tape or use a packaged tape and sew it around all of the edges of the skirt.
Now, for the ruffle!
Cut strips measuring 3" x "x" inches. You need the final length to measure about 1,528 inches! so you will definately need to piece lengths of fabric until you reach this length. (Since it is such a long length, I found it easier to work with smaller strips and just pin as I went along the base of the skirt later on)
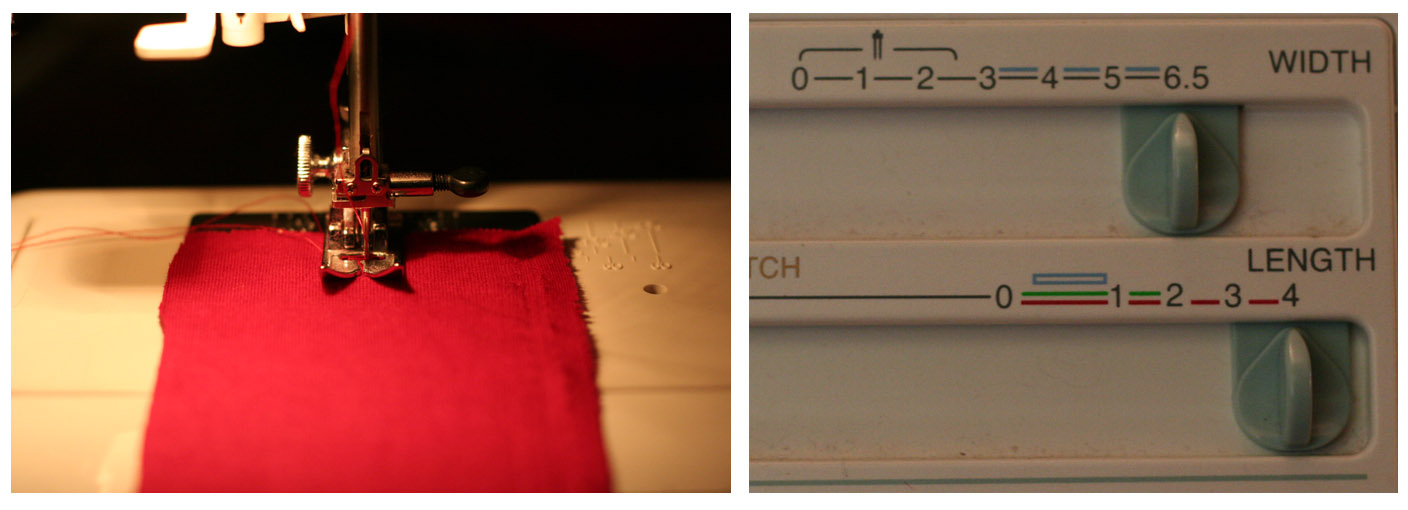
Take one of your 3" wide strips and baste down the middle of it. You can do this easily by moving the length of your stitch to '4'. Just eyeball the middle for this project.
 Then, take one of the end strings and pull GENTLY, cinching the fabric as you go. Keep pulling a little, and cinching the fabric down until it reaches a fullness that you like.
 When you are done cinching that strip, pin it to one of the corner edges of the base of the skirt. Move the cinched strip in a zig zag pattern as you go around the base of the skirt.
 This will give the ruffle a fuller look. Pin the strips as you go all the way around the base. When you're finished, hand sew these all into place so that they are secure.
 Your tree skirt is looking pretty good about now, and you could leave it as is at this point. If you would like a closure at the slit, you can add some velcro, button holes and buttons, or snaps. I chose some snaps for mine. It was all I had on hand yesterday, and gave a clean look to the top. I choose to make these sweet little flowers from Natalie Chanin as pom-poms to cover the snaps.
 Now go put it under the tree and enjoy your hard work!

What you'll need:
3 yards of knit fabric
1 yard cotton batting
bias tape
coordinating thread
quilting ruler (I prefer a plexi 6"x24")
quilting needle
sewing machine
closure-velcro, snaps, buttons (optional)
To begin, measure your tree at the base to get it at the widest point then add 4 inches . (I don't have a fairly large tree. Mine measured at 40" so we'll use that for this tutorial)
Open your fabric and measure from the left side over 22". Mark the center and moving your yard stick around, keep the zero line on the center and measure out 22" all the way around. Make your tick marks close enough together that you feel comfortable enough in connecting them to form a circle.
After you have your circle drawn, measure 2" from the center to form an inner circle 4" wide. This circle will be the opening around the tree stand.
Draw one line from the center to the edge of the circle. Cut out your circle, removing the inner circle, and cut along the line for the opening. Repeat this to the batting, and backing material. (You can pin the front and back fabrics together to save time before you begin cutting but I do not recommend layering all three at once)
After you have cut all three-front fabric, batting, and backing, position them to be quilted!
 Carefully pin around the edges of the tree skirt, up the opening, and around the inner edge.
From the inner circle, measure down 3"onto the slit and mark. Draw a line at a 45 degree angle across the tree skirt. Flip your ruler and draw a 45 degree angle in the opposite direction on the same 3" mark. You should now have one big "X" on your skirt. Take your ruler, measure 3" over from the first line you drew. Repeat this process across the entire tree skirt. Do the same to the other diagonal line until you have all of your quilting lines drawn.
 Carefully pin the tree skirt so that all of the layers stay in place as you begin to quilt the tree skirt.
 Starting with one of the middle lines you drew, sew from one end to the other of the tree skirt. Sew the next line over, and repeat moving from the inside to the outside of the tree skirt.
Once half of the lines are dawn, sew the lines that run in the other direction in the same manner-starting in the middle and moving outwards.
Now your tree skirt should be quilted!
To finish the edges, you can either make your own bias tape or use a packaged tape and sew it around all of the edges of the skirt.
Now, for the ruffle!
Cut strips measuring 3" x "x" inches. You need the final length to measure about 1,528 inches! so you will definately need to piece lengths of fabric until you reach this length. (Since it is such a long length, I found it easier to work with smaller strips and just pin as I went along the base of the skirt later on)
Take one of your 3" wide strips and baste down the middle of it. You can do this easily by moving the length of your stitch to '4'. Just eyeball the middle for this project.
 Then, take one of the end strings and pull GENTLY, cinching the fabric as you go. Keep pulling a little, and cinching the fabric down until it reaches a fullness that you like.
 When you are done cinching that strip, pin it to one of the corner edges of the base of the skirt. Move the cinched strip in a zig zag pattern as you go around the base of the skirt.
 This will give the ruffle a fuller look. Pin the strips as you go all the way around the base. When you're finished, hand sew these all into place so that they are secure.
 Your tree skirt is looking pretty good about now, and you could leave it as is at this point. If you would like a closure at the slit, you can add some velcro, button holes and buttons, or snaps. I chose some snaps for mine. It was all I had on hand yesterday, and gave a clean look to the top. I choose to make these sweet little flowers from Natalie Chanin as pom-poms to cover the snaps.
 Now go put it under the tree and enjoy your hard work!


This is so cute! I have the worlds ugliest tree skirt on my nice tree (upside down, as to only show the plain red side) and nothing on the kids tree. I will have to look through my fabric pile and get to work.
ReplyDeleteI love this tree skirt!!!! Thanks for the tutorial!!!
ReplyDeleteI was looking for your sew mama sew giveaway but think I will have to make the tree skirt, thanks
ReplyDelete