


Housewarming gifts are fun to make. I think I enjoy giving them so much because I can only fill my cabinets with so many dish towels and potholders, and I love to make them.
No matter what someone's decorating style is, they can always use a festive accent in the kitchen!This gift is for myself, though. I have this (used to be) lovely set of potholders from Anthropologie but they are looking pretty worse for wear these days.
No matter what someone's decorating style is, they can always use a festive accent in the kitchen!This gift is for myself, though. I have this (used to be) lovely set of potholders from Anthropologie but they are looking pretty worse for wear these days.
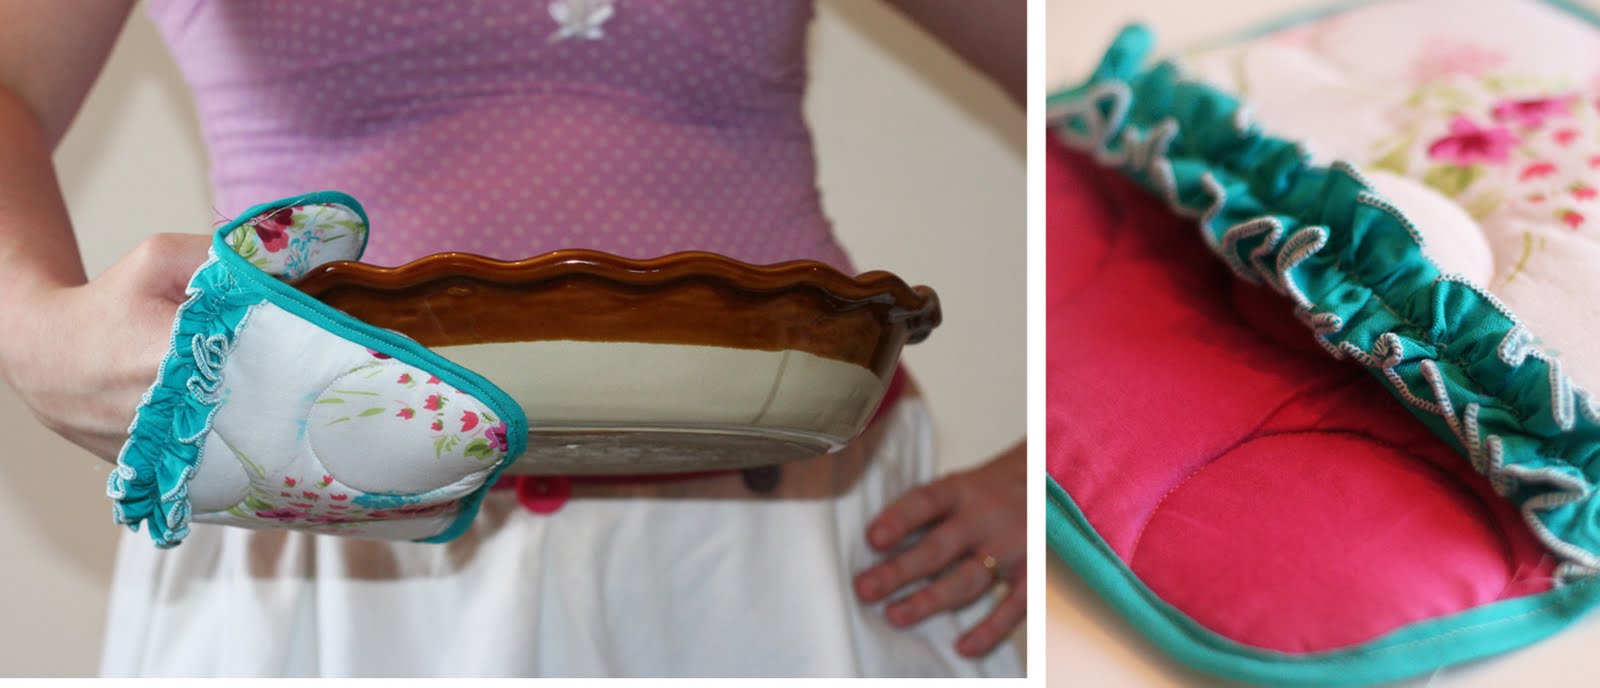
I love potholders with pockets, and this one is only made better with a ruffle! If you'd like to make one, follow the tutorial here:
Materials:
1 7.5" x 7.5" square of main fabric
1 7.5" x 7.5" square of accent fabric
1 7.5 x 5" rectangle of main fabric
1 7.5" x 5" rectangle of accent fabric
1 7" x 7" square of insulated batting
1 7" x 7" square of cotton batting
1 7" x 4.5" rectangle of insulated batting
1 7" x 4.5" rectangle of cotton batting
Double Fold Bias Tape
1.25" x 15" fabric strip for ruffle
1.25 x 6" strip for loop
Supplies:
Sewing Machine
Serger (optional)
Thread
Scissors
Ruler
Invisible Marker
1. To begin, assemble the square pieces for the back. When using the insulated batting, always make sure that the shiny side is the side that will be touching the heat. So layer the back fabric, the insulated batting (shiny side towards the wrong side of the back fabric), the cotton batting, and then the accent fabric, right side up.

2. Quilt the potholder. I chose a simple circle design and just quilted it on my sewing machine. It works best if you start in the middle and work your way out.

3. Assemble the rectangle pieces the same way you did the square. Layer the back fabric, then the cotton batting against the wrong side of the fabric, the insulated batting with the shiny side up, then the fabric you want on top (wrong side facing the shiny side of the insulated batting).
4. Quilt the rectangle on your machine.

5. Open the bias tape and pin it to the back of the rectangle, right sides together.

6. Using 1/4" seam allowance sew down the edge of the bias tape attaching it to the rectangle.

7. Fold the bias tape back over to the front side of the potholder. Sew down the edge with a narrow top stitch.

8. For the ruffle, make a narrow hem on your serger or just hem each end.

9. Use a long basting stitch to sew down the center of the ruffle strip.

10. Cinch the ruffle and fit it to the top of the pocket with the center of the ruffle falling at the bottom of the bias strip.

11. Sew down the center of the ruffle on your sewing machine then remove the basting threads
of the ruffle then set aside.

On this particular potholder I used ric rac. If you would like a fabric look, follow these steps, if not, skip to step 16
12. Fold the strip for the loop in half lengthwise, right sides together. Sew down the side with 1/8" seam allowance.

13. Using a safety pin, turn the tube right-side out.

14. Position the seam so that it is in the middle on the back side and press.

15. Sew down each side with a top stitch, ensuring that the loop wont twist on you.

16. Now fold the loop in half, matching the ends and pin into place on the backside of the square for the potholder.

17. Place the pocket rectangle over the square potholder.

18. Using a basting stitch, secure the sides together so that they don't slip while you are sewing the bias tape on.

19. Sew the bias tape onto the potholder the same way you attached it to the top of the pocket. Open the bias tape and place the edge against the raw edge of the potholder, pin all the way around, making a small curve at the corners. Sew around the perimeter of the potholder with 1/4" seam allowance.

20. Trim the corners so that they are slightly round. This way the bias tape will fit around the curve nicely.

21. Fold the bias tape over to the front side of the potholder and pin into place. Sew around the perimeter with a narrow topstitch, making sure to keep the loop out of the way as you go around that corner.

22. The potholder is finished! A pair of these would make a nice gift along with my round dish towel!


You have really put a lot of work into your ruffled potholder and it is wonderful. Thank you for sharing your tutorial. Happy creating...
ReplyDeleteReally cute! Can't wait to make some for an upcoming bridal shower ( and I know she will love it too!)
ReplyDeleteSo glad I found this! Loving the ruffle...
ReplyDelete